Cryogenically-treated and gas-slotted rotors by Diversified
Cryogenics
Hawk HP Plus High Performance street/autocross pads
TMS Stainless Steel Brake Line kit
ATE Super Blue Brake Fluid
Caliper rebuild kits for front and rear
Can of Plastikote "Ford Red" high temperature paint
Unfortunately I forgot
my digital camera in my rush off to Ralph's to do the brakes so I don't
have any nifty install photos. :^(
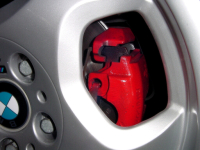
Risking being branded
a ricer, I decided to clean and paint my calipers "Ford Red"
by Plastikote ($4.99/can at Pep Boys). This is a hi temp paint rated
for up to 500 degrees F. I was initially concerned about the heat range
of this paint because I don't know how hot the calipers are likely to
get under normal to aggressive driving conditions. My other alternative
at the time was a 1500 degree paint but it required baking in a 600
degree oven for over an hour. If my kitchen oven went to 600 degrees
I would have gone that route (and been in trouble with the wife) but
I'm making due with what's available. Everything seems just fine so
far and I don't anticipate any heat-induced problems as the calipers
are cool enough to touch after normal driving. We will soon see how
the Plastikote holds up under heavy autocross abuse. The new caliper
color is more understated than I had originally thought and I think
it looks quite tasteful. Then again, anything is better than crusty
brown/gray. There are high-tech ceramic coatings that can be applied
to calipers, headers and other high-temperature parts if you want the
ultimate thermal and corrosion protection. One day I might look into
this but for now I am going low-budget and I can't have extended downtime
on my daily driver.
The stainless steel
brake lines from Turner Motorsport (www.turnermotorsport.com)
went on without a hitch and give the brake pedal a nice firm feel. They
also dress up the wheel well along with the newly painted calipers and
my shiny new ground control components. Not that you can see any of
this unless the car is on a lift or the wheels are removed. I feel comfortable
in the knowledge regardless.
On to the rotors!
These are cryogenically-treated rotors from Diversified Cryogenics (www.frozenrotors.com).
I have read their propaganda on cryogenically treating brake rotors
for longer life and resistance to warping, but it's all a little too
on the verge of snake-oil for me to justify paying 3 times over OEM
prices. I bought this set of rotors from a local E30 M3 racer (who got
fed up with rebuilding his S14 with a voracious appetite for rod bearings)
offering them at a very attractive price. I originally had my eye on
a set of slotted rotors from Bavarian Autosport but this deal came along
at the right time and the price was better than right. The rotors were
brand new "BMW Original Teile" (EvoIII OEM) custom slotted
and cryo-treated at the Diversified Cryogenics facility. As time goes
on I will report on the endurance and my satisfaction of these controversial
rotors.
The pad I chose was
the Hawk HP Plus. This is a very popular performance street/autocross
pad that bridges the gap between a low friction street pad and high
performance racing compound. It is important to note that these pads
tend to squeak and dust more on average than their street counterparts
but you will never get something for nothing, especially out of a performance
car. The price you pay in a little noise and dust is more than compensated
for in the stopping power and fade resistance the HP Plus offers. I
love these pads and will recommend them to anyone looking for serious
stopping power on the street or at autocross. If you will be spending
an appreciable amount of time at track schools or on the race course
you will want to go up a notch or two and use one of Hawk's full on
racing compounds - the Blue 9012 (medium duty) or the HT10 (heavy duty).
If your car is dual duty you will need to change from your street pads
to the race pads once you get to the track as the more advanced compounds
are generally unsuitable and unsafe for normal driving. I have no direct
personal experience with these maximum performance pads so I will encourage
you to consult an expert if you have questions about them.
I nearly forgot to
mention the caliper rebuild kits. Perhaps my brain is trying to block
this experience from my mind forever. First, I will say that this job
is infinitely easier if you have access to compressed air. Using air
allows quick and easy removal of the pistons from the calipers. When
using this method you must be very careful that your fingers and other
appendages aren't anywhere near the business end of the piston. Once
the air pressure is built up it creates a near explosive force that
can send the piston somewhere very uncomfortable. I found that putting
a small piece of wood between the piston and the caliper housing and
using LIGHT TO MODERATE air pressure works very well. The wood block
catches the piston and absorbs the shock as it is jettisoned from the
housing, saving your fingers for scraping, burning, nicking and smashing
on other jobs. Second, after quite a bit of fiddling, the three of us
managed to almost get one front seal kit and dust boot on. This was
pretty frustrating at first but we soon discovered an easier way. It
is difficult to explain without the added benefit of pictures so I will
just say that you can slip the dust boot over the piston leaving some
slack at the back end. This will allow you to insert the ridged portion
of the boot into the recess in the caliper housing and then slide the
piston right in. It is really much easier than it sounds. Why do I always
have to find these things out the hard way? :^) As for the rear seal
kit - it is an intuitive and straightforward installation. The seals,
pads and ATE Super Blue fluid were purchased from Bimmerworld (www.bimmerworld.com). As always James Clay provided great
product and service at a great price.
The bedding process
was great fun and went without incident because by the time our task
was complete it was after 1:00 am and the dark streets of Saratoga were
barren. Separate bedding instructions were included with the pads and
the rotors so we sort of combined the two since they didn't directly
contradict each other. It involved the usual certain number of stops
from various speeds followed by a cool-down period. After things cooled
a bit we bled the system once more for good measure. The project finally
complete, I drove home with a smile on my face.
Thanks for reading.
Please contact me
with any questions or comments.
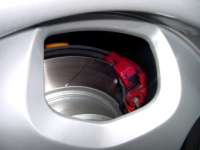
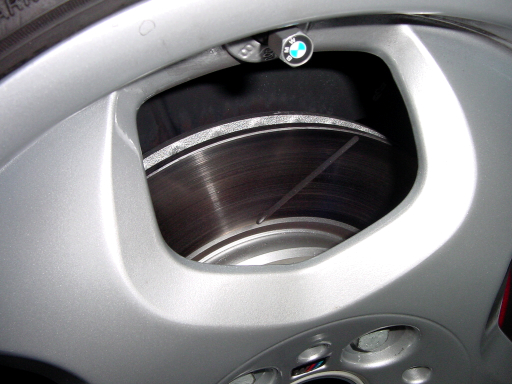 Front slotted rotor
Front slotted rotor